DTF Printers are another level of advanced technology that has changed the industry from tails to heads. If you have used one of these printers, you must have enjoyed it but there is still one big question:
How can you clean a DTF Printer head? Well, that’s what we will be talking about today. I’ll share with you some video links that show how to do it but I’ll be explaining the script to you in this article.
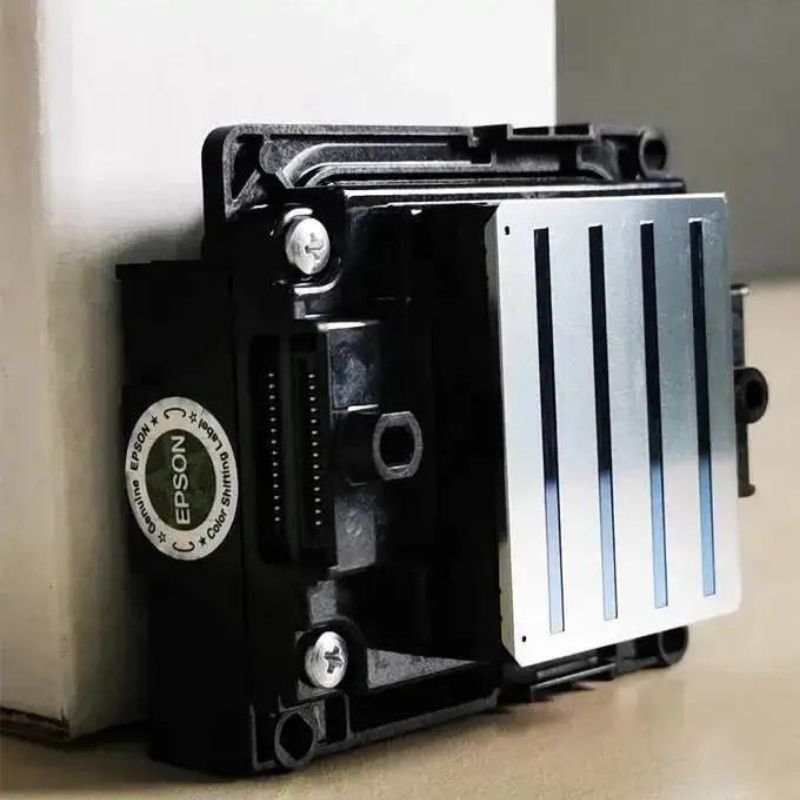
First of all, take the tank on the disc and use a simple screwdriver to turn the bolts left three times then use that screwdriver to remove the screw out and then move the plastic part out.
Now you may remove the Ink and temper each color by color (they are kept on the left side of the printers). Then you may use a specific type of cleaning solution for cleaning a printhead which is by syringe with a simple soft tape which is around the 3ml for one color.
Then connect it with the heat loser and move the head to the right place under the cup to slowly pump the cleaning solution into the side of this printhead.
There is a type of paper which you will later use to dry the cup with then you may do it color by color. You might also need to clean the wiper. To clean the wiper, you may need to use a simple and unique type of moisturizer. Put some in a cup of the given size then move the heat to the right under that cup.
You may then restore the cup and after cleaning, you may now put back the tools inside the printer and close it. The printer head will be as good as new.
Okay, now I am going to show you how to do the deep maintenance for the DTF printhead.
So usually, other people unintentionally break something whenever they do this operation but must know that you don’t need to forcefully push the printhead to open. But the creative way of releasing this printhead is to try pressing the head once.
Once the printhead is moving, you can try switching off the source of power (the switch). You need to get a screw so that you can take out all the damper (apply to all the dampers).
Sometimes it’s a bit harder especially if it’s the first time. so, you tear all out the damper. Make sure to get all the dampers usually I will take the three-tree damper you can also use a rubber band to pack it.
This is how you can tell the whole planet if let’s say you want to clean the heat pattern, please make sure to be 100% careful. So, you will need to use an alcohol pad. If you look inside, you can see that the printhead line is vertical.
You can see it when you open yourself. For everything you do, be careful for example, you can use a liquid right from the top and then squeeze it down to the bottom a few times. This also can help you to make sure the preheat doesn’t clog so you can see that there.
If let’s say the ink cloth problem still cannot be solved with the wrap of the alcohol pad, there is another method that involves the use of the cleaning liquid to flush through the printhead so you can turn it over.
So, you can get the cleaning liquid from your ink supplier because most or maybe all the ink suppliers have this liquid. Then you’ve got to get a sergeant plastic tube and for this step, you must be extra careful not to spill all the cleaning liquid onto your printer.
After cleaning the head, make sure to install all the dampers usually you may push them to the right-hand side then you must arrange nicely the tube equipment back to its primary location.
One by one make sure everything is put back in the same location only then you can put back the plastic stripe to make the hose nicely. Usually, after you do all this main printhead maintenance at the same time you can also be doing the cleaning of the other two pieces of equipment which include the wiper and the ink station.
After finishing that step, you may then push it to the left-hand side so you can see a wiper; you can use a tweezer.
So, you may push a wiper up in a tweezer then you get an alcohol pad to help you clean the wiper. This wiper is very similar to a car screen wiper.
Make sure it is clean. Sometimes, it is very crucial and necessary to do it a little bit harder to take out all the dirt.
Sometimes let’s say you might see the dirt and you think of using a tweezer to clean the thing holding out wherever you see as dust. Usually, it is recommended to use the same cleaning liquid.
Put a little bit inside the head but don’t overdo it because, at the end of the day, it won’t work for you. As you can see, this is how easy the whole DTF printer Head cleaning process is.
Try to suck the cleaning liquid out and place it outside. Sometimes you can do twice as you can and don’t try to overpower it. Here’s a tissue paper to tear out the cleaning liquid yep now wiper insulation so everything is clean and ready after assembling all the clean parts back to their original place.
You just do a one-time check on the head cleaning: Press the button for about five to ten seconds on the ink drop icon this is the approved way of successfully approaching and completing the head cleaning process.
Once the head cleaning is finished, then you might need to do just one nozzle check to see the printer’s current condition. If everything is perfect then you can continue to do your printing job and possibly earn more money!
Below are the VIDEO LINKS to watch videos to help you see more.